Digital Learning & Design

While teaching face-to-face courses, do you write on white- or blackboards to illustrate concepts?

If so, you might be wondering how to replicate this activity over Zoom. In this article, we outline several options for digital annotation during your Zoom class. 

It is important to note that when teaching in a remote accessible classroom–with both remote and physically present students–any instruction that requires writing on a surface must be done digitally, using a digital writing tablet and digital whiteboard. Remote students will not be able to adequately see writing on a physical blackboard or whiteboard in the classroom.
Jamboard is a collaborative whiteboard used to create and edit content with other users in real time. Students and instructors can prepare, access and share Google Jamboards with their Brown Google account, and work is saved automatically. When used during a Zoom class, students can access and collaborate in Jamboard without having to share a screen in the Zoom meeting since the app functions like a Google Doc.

The app is available on any device that runs Android or iOS, such as a phone, a tablet, or an Android-enabled Chromebook. (Download for iOS / Download for Android.) A browser version is also available at https://jamboard.google.com.  The browser version does not have all of the same features as the app, but it allows users to participate using sticky notes and basic drawing tools. Multiple people can contribute to the board at the same time from any location.

Visit Google Jamboard help to learn more about Jamboard features and tools.

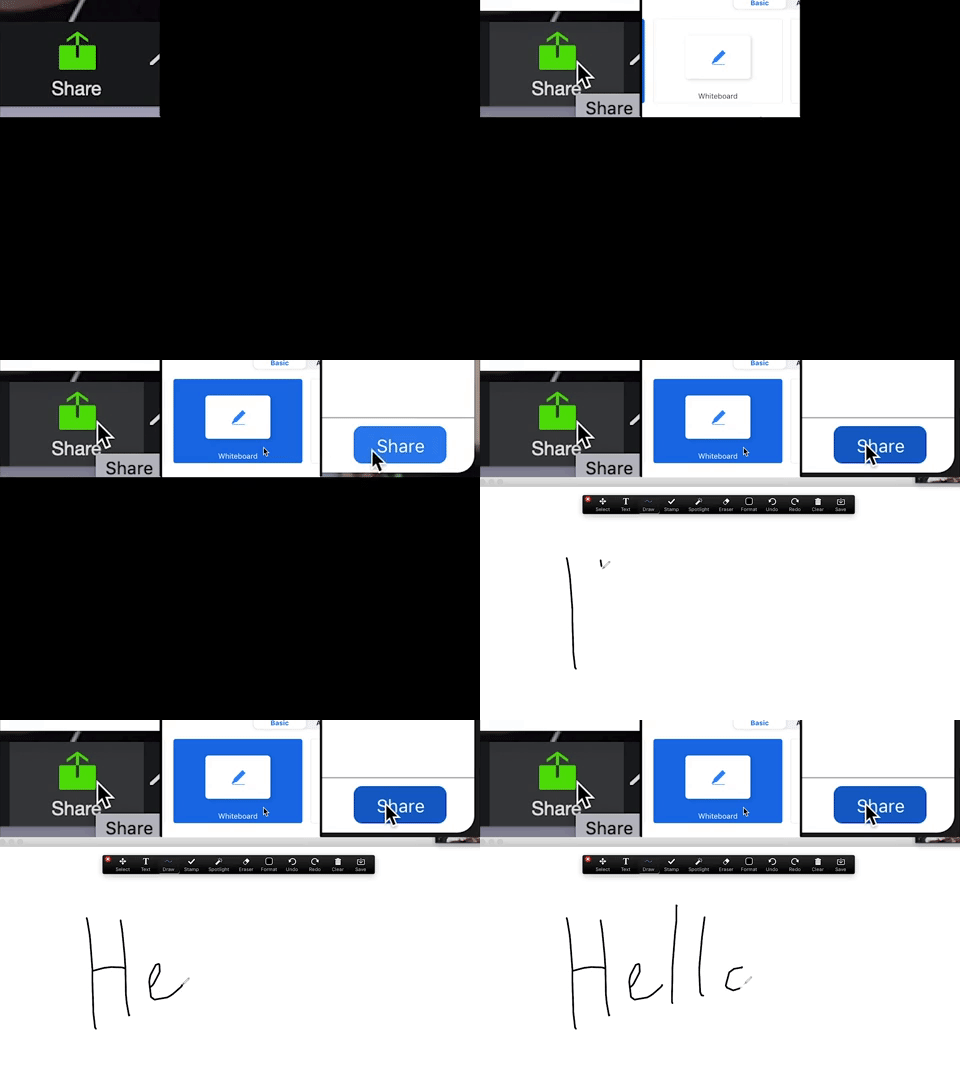
For instructors who use a graphics tablet, Zoom provides a built-in whiteboard for digital writing and drawing.

  1. Press green share button at center bottom of Zoom window

  2. Choose “Whiteboard” from options.

  3. Press “Share” at the bottom right of the window.

Hello being written on zoom whiteboard


For more details, Zoom provides these instructions to help you get started

You can use a mobile device as a digital writing surface in Google Jamboard or during a Zoom meeting. Using this method, an inexpensive stylus will vastly improve the writing experience. Styli are widely available on Amazon at a variety of price-points.

If using Google Jamboard, simply open up the Jamboard app on your mobile device. You will remain on the Zoom meeting on your computer for video and audio communication. (See the above section on Google Jamboard.)

If using the Zoom whiteboard, there are several ways to connect your mobile device:

  1. Join the Zoom session from both your computer and your iOS or Android device. Use the computer for video and audio communication, and the mobile device for accessing the whiteboard. (Make sure you mute the audio on your mobile device.)
  2. If you have an iOS device (iPhone or iPad), you can connect it to your computer and share your device’s screen as a secondary source.

If you have a newer Mac and iOS device, you can use Apple’s Sidecar feature to connect your iPhone or iPad as a second touchscreen display.

The fundamental obstacle for digital annotation is finding the appropriate writing interface. Computer mice and trackpads are poor tools to simulate writing. Ideally, instructors would use a graphics drawing tablet and stylus. Many such options can be found for purchase online. 

Graphics drawing tablets come in two basic varieties: cheaper models that do not include a digital screen (One by Wacom) and more expensive models that use a digital screen to allow you to see as you write (Wacom Cintiq). While the screen on the expensive models is desirable, these models are also more difficult to set up and require more powerful computers. For about the same amount of money, one could purchase an iPad and gain more functionality. 

For these reasons, we suggest interested instructors purchase a model without the screen. These screenless tablets are about as easy to setup and use as a new mouse or keyboard. Here are some recommended tablets:

The IT Service Center has a limited quantity of tablets available for long-term loan to instructors. If you are interested in acquiring one, please email dld@brown.edu.

The least technically complicated solution involves the use of PowerPoint’s animation capabilities to simulate the “writing” of new content. In this scenario, instructors would need to prepare comprehensive PowerPoint presentations ahead of each class. Instructors should...

  1. Structure the presentation so each slide in the presentation would serve to explain a separate concept, or component of a concept. 
  2. Prepare text and images as separate objects within each slide. 
  3. These objects would then be “animated” to appear in sequential order. 
  4. PowerPoint also includes lightweight tools to draw over slides. Instructors can choose to leave white space on slides if they desire to include live drawings. 
  5. Some faculty may need to include mathematical and other non-standard symbols. Here are instructions

PowerPoint is available for download as part of the Microsoft Office Suite at http://software.brown.edu/.

If you are pre-recording lectures from your home or office, you can capture yourself on camera writing on a physical white- or blackboard (or substitute), as long as your writing is clearly visible on camera. In this video, we share tips for how to do this effectively:


A document camera can be thought of as the 21st century version of the overhead projector. It is a camera-- usually with a built-in LED light-- that records images or video of items that you place underneath it. You can plug the document camera straight into your PC, Mac, or Chromebook and livestream a demonstration or annotation to your students.

Top Tips for Document Cameras:

  • If you have a small white board or transparency paper with dry erase markers, it may be easier and more eco-friendly to quickly erase your writing rather than having to keep swapping out paper.

  • Make sure that you have plenty of space on the side of your laptop that you plan on placing the document camera.

  • Place the document camera on the side of your laptop or desktop that also aligns with the writing hand you will be using (i.e. - If you are right-handed when writing, place the document camera to the right of your laptop/desktop).

  • For easier readability on a white surface, use a dark marker (e.g. Sharpie, if using paper).

  • Keep a stack of paper (more than you think you will use) next to you, but out of frame.

  • Place duct/masking/gaffer’s tape on your table to mark the edges of your paper/whiteboard. That way if you accidentally move your paper/whiteboard, you can easily reposition it. This will ensure that what you write/draw will stay within the area visible to the document camera and therefore the students as well.

  • Place a small piece of tape on the table to reuse with each piece of paper you put down. This will help from needing another hand to stabilize the paper and therefore add another obstacle to obstruct the students’ view.

  • After writing something, make sure to remove your hand from the paper so you are not blocking what you have just written out. 

  • You may need to use a desk lamp to brighten up the writing area.

  • In addition to drawing on blank paper, you can also use the document camera for reviewing passages of text or any other physical object.

For use with Zoom: 

  1. Plug into USB port (If you have a newer Mac, you will need a USB to USB-C adapter))

  2. Start Zoom session

  3. Click “Share” and go to “Advanced”

  4. Choose “Use a Second Camera”

  5. Camera will automatically work and the host will be able to switch between webcam and document camera via the little “Switch Camera” button in the upper left-hand corner of the video feed that’s currently active